Securing Kubernetes services with OAuth2/OIDC
- Technology
Recently I was tasked with finding a way to secure one of our Prometheus instances we have deployed in Kubernetes. This proved a slight challenge as Prometheus doesn’t actually support any authentication mechanisms out of the box. After a bit of searching, I discovered this useful little open-source reverse-proxy oauth2-proxy as well as some features of the NGINX ingress controller that would allow us to add OAuth2 authentication with relative ease.
As this solution can be used to add authentication to any Kubernetes service that cannot directly be integrated with an OAuth2 provider, I thought it would be useful to document it below.
What we will end up with
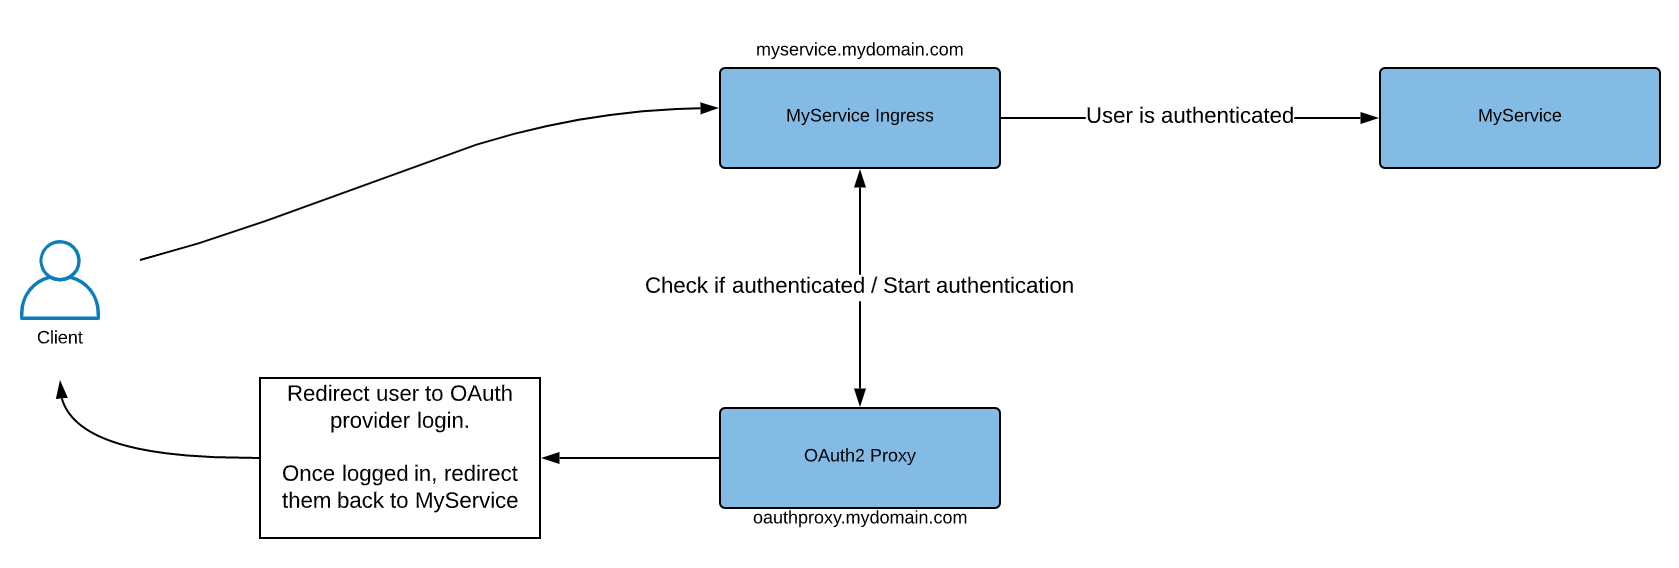
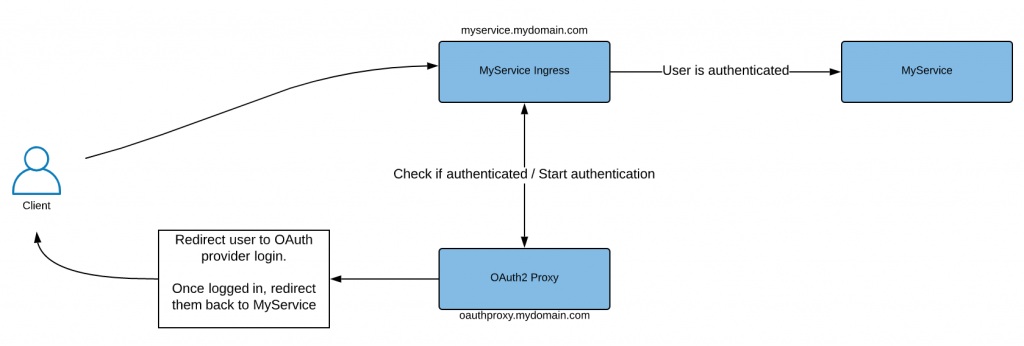
By the end of this post, we will end up with an authentication flow that looks something like this:


Our authentication flow will be as follows:
- Our user tries to access
MyServiceviamyservice.mydomain.com. - The ingress controller will make a call to our
OAuth2 Proxyto check if the user is authenticated. The proxy does this by verifying that a cookie it has issued is present in the request. If the user is authenticated, they are granted access to the service. - If the user is not authenticated, they are redirected to an endpoint on the
OAuth2 Proxyto start the authentication process. - The proxy redirects the user to login to the configured OAuth2 provider.
- Once the user has logged in, they are redirected back to the proxy which will:
- Perform some validation on the information received about the user.
- Issue a cookie to the user in order to authenticate future requests.
- Redirect the user to the initial url they were trying to access:
myservice.mydomain.com.
Deploying the proxy
We will deploy the proxy to Kubernetes using the following YAML:
---
# service.yaml
apiVersion: v1
kind: Service
metadata:
  labels:
    app: oauth-proxy
  name: oauth-proxy
spec:
  type: ClusterIP
  ports:
    - port: 4180
      targetPort: 4180
      protocol: TCP
      name: web
  selector:
    app: "oauth-proxy"
---
# deployment.yaml
apiVersion: apps/v1
kind: Deployment
metadata:
  labels:
    app: oauth-proxy
  name: oauth-proxy
spec:
  replicas: 1
  selector:
    matchLabels:
      app: "oauth-proxy"
  template:
    metadata:
      labels:
        app: oauth-proxy
    spec:
      containers:
      - name: oauth-proxy
        image: "oauth2-proxy/oauth2-proxy:v6.1.1"
        env:
          # OIDC Config
          - name: "OAUTH2_PROXY_PROVIDER"
            value: "oidc"
          - name: "OAUTH2_PROXY_OIDC_ISSUER_URL"
            value: "https://signin.my-oidc-provider.com"
          - name: "OAUTH2_PROXY_CLIENT_ID"
            value: "<my oauth client id>"
          - name: "OAUTH2_PROXY_CLIENT_SECRET"
            value: "<my oauth client secret>"


          # Cookie Config
          - name: "OAUTH2_PROXY_COOKIE_SECRET"
            value: "<my cookie secret>"
          - name: "OAUTH2_PROXY_COOKIE_DOMAINS"
            value: ".mydomain.com"

          # Proxy config
          - name: "OAUTH2_PROXY_EMAIL_DOMAINS"
            value: "mydomain.com"
          - name: "OAUTH2_PROXY_WHITELIST_DOMAINS"
            value: ".mydomain.com"
          - name: "OAUTH2_PROXY_HTTP_ADDRESS"
            value: "0.0.0.0:4180"
          - name: "OAUTH2_PROXY_SET_XAUTHREQUEST"
            value: "true"
          - name: "OAUTH2_PROXY_UPSTREAMS"
            value: "file:///dev/null"
---
# ingress.yaml
apiVersion: extensions/v1beta1
kind: Ingress
metadata:
  labels:
    app: oauth-proxy
  name: oauth-proxy
spec:
  rules:
    - host: oauthproxy.mydomain.com
      http:
        paths:
          - path: /oauth2
            backend:
              serviceName: oauth-proxy
              servicePort: 4180
---
There’s nothing too special going on here as far as the deployment of the proxy is concerned. We create an ingress for the proxy which binds to the hostname oauthproxy.mydomain.com. This ingress points to a Kubernetes service, which in turn, points to the deployment for our proxy.
As for configuring the proxy, there are quite a few environment variables that we need to specify in order to get the proxy to integrate correctly with our OAuth2 provider and work in our desired configuration. Below is a breakdown of some of the more important configuration options and what they do:
OAUTH2_PROXY_OIDC_ISSUER_URL: This is the url for our OAuth2/OIDC provider. Clients will be redirected here to authenticate.OAUTH2_PROXY_CLIENT_IDandOAUTH2_PROXY_CLIENT_SECRET: These are the OAuth2 Client ID and Client Secret that will be used during authentication. They should also be configured in our OAuth2 provider.OAUTH2_PROXY_REDIRECT_URL: This is the url to redirect to once the user has been authenticated by our OAuth2 provider. In our case, it is the/callbackendpoint for the proxy itself.OAUTH2_PROXY_COOKIE_SECRET: This is the seed string used for secure cookies created by the proxy. To generate one, run:python -c 'import os,base64; print(base64.urlsafe_b64encode(os.urandom(16)).decode())'OAUTH2_PROXY_COOKIE_DOMAINS: This is the domain for the cookie created by the proxy. In our case, this will be the root domain that hosts both our proxy and the service we are locking down access to.
A full list of the configuration options supported by the proxy can be found here. You may wish to change some of these to support your own setup.
Using the proxy with NGINX ingress
Now that we have the proxy spun up, we can configure the ingress for the service we want to lock down to authenticate using the proxy. This can be done by adding the following annotations to our ingress definition:
annotations:
  nginx.ingress.kubernetes.io/auth-signin: http://oauthproxy.mydomain.com/oauth2/start
  nginx.ingress.kubernetes.io/auth-url: http://oauthproxy.mydomain.com/oauth2/auth
  nginx.ingress.kubernetes.io/auth-response-headers: X-Auth-Request-User,X-Auth-Request-Email
This will configure NGINX to authenticate requests by calling the oauth2 proxy’s /auth endpoint passing the session cookie issued by the proxy (if present).
If the request cannot be authenticated, the client will be redirected to the /start endpoint to initiate the authentication flow.
Conclusion
If you have followed along, you should now have locked down access to a Kubernetes service that does not support OAuth2/OIDC as an authentication mechanism directly.
There are a lot more configuration options available to us when using oauth2-proxy as well as out-of-the-box support for a number of authentication providers. To learn more about this, I would suggest referring to the official documentation for the project.
Written by Yussuf Burke, Developer at G-Research
